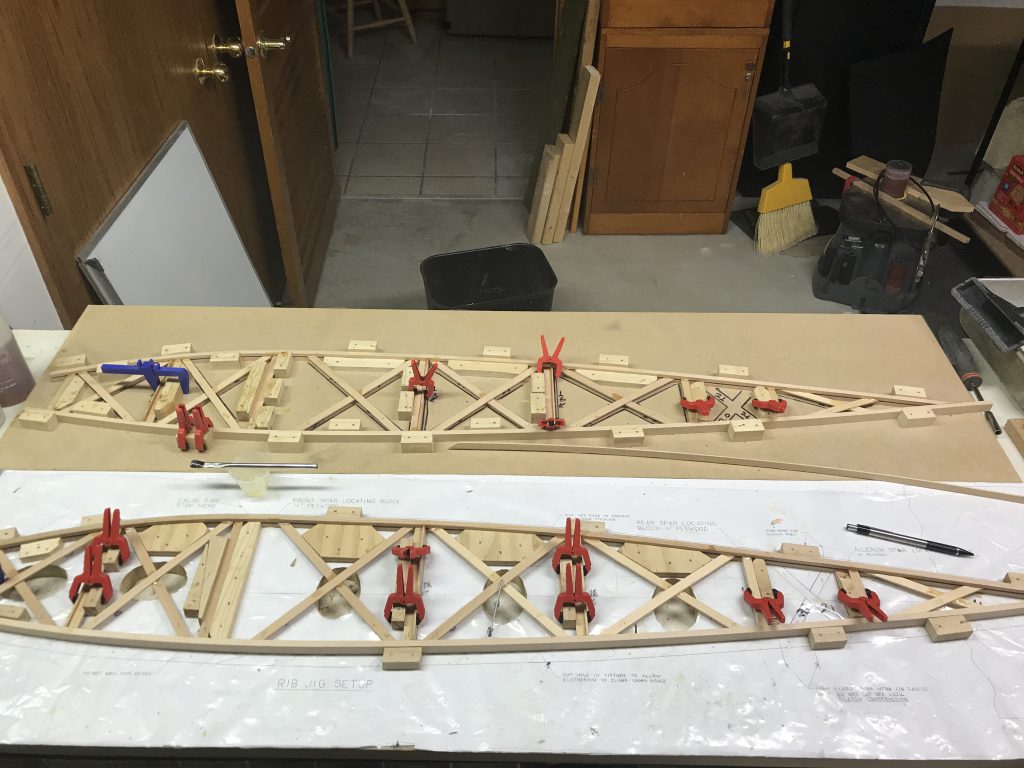
Another rib

Just so I could feel like I’m not totally stalled, I built rib #15 this weekend.  6cc of glue turned out to be just about right, with no skimping and very little excess.  The new method of mixing and applying the epoxy with an acid brush worked out well.  I think I will go back to an earlier idea I had, of pre-wetting the groove with glue before putting the top and bottom capstrips into the jig.  It will be easy to do with the brush, and will save some assembly time.  I have a template with pencil marks defining where the glue should go; I think I’ll mark the glue lines along the bottom and top of the jigs to make it easier to apply the glue.

Mixing epoxy

I’ve been mixing epoxy in the little plastic medicine cups using “craft sticks” (think Popsicle stick).  I thought I was doing a pretty good job of stirring, spending some time scraping the sides and swiping along the bottom corners of the cup to ensure everything was mixed up.

Last night I mixed up about 2 cc of epoxy, mostly just to try out my new syringe dispensers.  I let it sit in the cup with the stick propped up in the center.  Today I popped the slug of glue out of the cup.  Lo and behold, there are sticky spots around the edge!  Nearly all of the glue is perfectly hard and cured, but there is just a tiny little bit of uncured epoxy right around the bottom edge.  Apparently the stir stick is not a good tool for making sure ALL of the material gets mixed together.

In light of that discovery, today I did another 2 cc sample.  This time I did the mixing with an acid brush with the bristles trimmed down to about 1/4″ to 3/8″.  After mixing I cleaned the brush out with a little MEK, just to see if that would be worth doing or not.  We’ll see how that one turns out after the epoxy has had a chance to cure.  Acid brushes are pretty cheap, so even if the MEK cleanup doesn’t work out it’s not a big deal.  You can buy the brushes by the gross for around $0.12 to $0.15 each.  But what will I do with about 950 craft sticks?  Good thing I have grandkids.


Prep work

I’ve been away from building for a while dealing with a remodeling project, the annual condition inspection on the RV-12, Oshkosh and few other odds & ends.  At Oshkosh I discovered that the wood shop guys had actually saved my miniature wing rib from last year (2016).  I brought it home with me, of course.  Last night I pulled the staples, cleaned it up and sanded it, and gave it a coat of clear polyurethane.  I figure it will make a nice wall decoration for my office.

Last night I also started cleaning up some of the enormous mess in the garage so I can get back to building.  I’m not quite there yet, but tools are slowly making their way back into drawers and onto pegs.  It may take a few more days, but it will be nice to get back out to a garage that’s not a complete disaster.  There are 14 wing ribs hanging on the wall, and the guy on the Biplane Forum is catching up with 11 finished.  He can work faster, since he can pull his ribs out of the jigs as soon as they are stapled.  I need to step up my game!

I did pick up a good idea from that discussion — using cut down acid brushes to mix & apply the epoxy.  They’re cheap, and it looks like I might be able to get more precise application of the glue where it’s needed, in the amount needed, with good penetration into the wood grain.  I’m anxious to try that, I have a handful of brushes here.  And, I got some of the epoxy  into 60 cc syringes so I can dispense exactly the same amount of each component.  I know it’s not terribly critical with T-88, but I still want to be as accurate as I can.

Bending more capstrip, and glue efficiency

Last night I tested out the upgraded steam box door with an hour of steam.  While that was going on I grabbed a chunk of scrap 2×4 and cut a second bending form.  I wasn’t happy with only being about to bend three lengths per run of the steam box.  I really need a better blade for that band saw…  this one is cheap, and while it will claw its way through a 2×4 it’s not something I would want to do regularly.

But — I have two bending forms, which means I can now do six lengths of capstrip at a time, so I won’t run out as often.  The steamer seems to work pretty well.  It’s not quite as perfect as if I had attacked it with a planer, jointer and an attitude of complete professionalism…  but I don’t have a jointer or planer, and even if I did what that steam would do to cheap flat sawn boards would be a real downer.  It works.

On the last several ribs I’ve been taking a different approach to gluing.  Early on I found that trying to glue up two ribs in one night meant working with epoxy that was starting to get a little stiffer than I would have liked.  I was using a popsicle stick to carefully spread glue in the groove, then on the braces, and assembling.  I was also having to fit each brace piece as I went along.  Each rib seemed to want about 10cc of glue, but I was getting a fair amount of it running down onto the plastic on the jig.

Now I pre-fit all the braces and mark them with their location.  I mix up the glue, dip the ends in the glue and put them in place.  I can work a lot faster and make less mess.  I’ve been seeing more left-over glue than I would like, as much as half what I mixed up.  I think about 7.5cc of glue per rib is more than enough.  I mixed 15cc for one pair of ribs and only had a little left over.  I’ve also been more careful about the glue mixing.  I had the ratios close enough to work well, since T-88 is not too critical.  Still, the darker B component was getting used faster than the A, and that tells me I’m not getting it completely right.  The stuff is pretty viscous, B much more so than A, and it takes a while to level out in the mixing cup.  Now I’ve been squeezing the B part into the mixing cup and walking away for a few minutes while it levels out.  Then I add the A component, walk away again, check back in a couple of minutes.  I can get it dead on 50/50 that way.  I may see about building a 100:83 balance scale to get it even closer.


Fixing up the steamer

I built two more ribs last night and took them out this morning; I’m up to 14 now.  I’m trying to 3D print some clamps too use on one of the jigs that has locating blocks too thick to use the small red sprig clamps I bought.  of course first I have to fix the 3D printer…

When I used the steam box, the door warped — no, curled outward.  I flattened it out, but because everything isn’t perfectly square it really only fits on one way so I can’t just flip it over.  Tonight I cut a couple of 3/4″ square stiffeners and epoxied them to the outside of the door.  I need to bend some more pieces of capstrip, and I can’t do that until the door is usable.  We’ll see if this is enough or not, should be interesting at least.

Still building ribs

I got two more ribs glued up last night, and popped them out of the jigs this morning.  That makes 11.  One jig needs some minor alterations to avoid gluing the ribs to the jig, so I’m gluing up one rib while I make those changes.  That will give me an even dozen ribs, and hopefully I’ll get another pair glued up tonight.

Trying out the steam box

The other night I finished up the steam box and made a set of little standoffs for the bottom.  I wanted to keep the wood off the bottom of the box to allow air circulation, but also allow water to run back to the low point at the rear.   I got a little lazy and didn’t put in dowels like most plans show.

Tonight I loaded it up with eight cap strips and let it run for 45 minutes while I went out and hung some outdoor lights on the deck.  When I came back I found that the door had developed a pretty good curl — concave from the outside – and was venting a lot of the steam past the door seal.  The spruce inside was fairly pliable, so I clamped three pieces in my bending form and put four more in the rib jigs.  They would only fit partway down in the jigs, since the wood is swollen.  While the wood cooled down I got all of the geodetic braces ready to install.  I’ll glue these two ribs up tomorrow night.

I did email System 3 about their epoxy.  Some of the ribs were assembled with the capstrips not pre-bent.  They’re fine, but the wood will spring out of shape if it gets hot enough for the epoxy to soften.  I don’t want that to happen. so I was thinking about clamping them in their current shape and steaming them to relieve some of the stress in the capstrip.  Of course that will soften the epoxy, and I wanted to know what that would do.  Their answer is that T-88 will begin to soften at around 120 degrees, but once returned to room temperature will be at full strength.  That’s great news.

I’m definitely not in love with the geodetic rib bracing design.  24 braces, no two alike, and I’m having to hand-fit them all.  It takes for-freaking-ever.  I have to wonder how much heavier 3/32 plywood would be with suitable lightening holes.  A guy could pop sets of them out on a CNC router in no time, save a ton of time and effort on the ribs, and probably end up with much stronger ribs too.   But, I don’t think I’m going to re-engineer the ribs right now.

Built a steam box

Last night I built a steam box out of 1×6 boards.  All that remains to be done is to put some foam weatherstrip on the door and run a few dowels through it to get the wood off of the bottom of the box for steam circulation.  The steam generator arrived a few days ago, so once I get the box finished up it will be ready to go.  I found that the Wagner steamer hose will mate with 1/4″ pipe fittings.  I spent a little extra for brass rather than galvanized iron.  I also re-worked my bending form with a gentler curve, providing a fairly close match for the rib shape.  It won’t give me a perfect fit, but will get the capstrip close to the curvature needed.


Finally — two more!

Glued up two more ribs tonight, at last.  I had dry fit the parts a couple of nights ago.  I really need to break down and build a steam box.  I ordered a Wagner 715 steamer, and will start on the box while I wait for delivery.