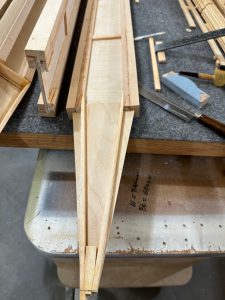
Ready for ribs

Well, the work bench is cleared off — well, at least enough to get both jigs on it.  I’ve got a couple dozen sticks of geodetic brace stock shaved down.  The epoxy syringes are filled.  All I need now is a razor saw and a steam setup.

Yes, I have a razor saw.  Somewhere.  I pulled it out during the kitchen remodel, and I remember seeing it in a box of tools we were using, but now I can’t find it.  It’s a Zona, good quality but inexpensive.  A new one is on the way.  Two, in fact; one medium and one fine tooth.  I also have a steam box that I built for the capstrips, but I’m unsure whether I’ll use it in the basement.  It takes bench space (which I now don’t have down there), and drips water out the end by design.  I’m thinking about ways I can use it vertically.  I had looked at rigging up a piece of pipe or something with a heating element for hot water, but it looked like an awful lot of extra work considering I’m over halfway through the ribs.  I’ll probably need it for the tail and wingtip bows as well, but I’m not entirely sure yet how I’m going to steam 6 to 9 foot long strips of wood.  Tonight I tried soaking half a dozen capstrips in a bucket of hot water for an hour — we’ll see how well that worked. 

Back to working in pairs

I finally went out and got the second rib jig from the garage and brought it down to the basement.  Ribs 24 & 25 are now curing, they will be ready to pull tomorrow evening.  My new routine:

  • Put the first jig on the bench.  Cut all the pieces fro one rib and set the geodetic pieces above and below the rib caps, ready to glue.
  • Stack the second jig on top of the first, cut all the pieces for it.
  • Mix up enough glue for both ribs (14cc seems about right)
  • Glue up the rib in the top jig and set it aside.
  • Glue up the rib in the bottom jig.

Double the completion rate.  I’m out of pre-cut geodetic pieces, so now I”m marking and cutting them individually with a razor saw.  It doesn’t take much longer, really, and each one is cut exactly to fit.

I’m almost out of pre-curved top capstrips.  The comments on the plans say you can bend the spruce dry and glue the ribs.  I don’t like the idea of having that much tension on the wood.  The nice thing about working indoors, though, is that I can keep hot water hot longer.  When I run out of pre-bent pieces, I’ll try the hot water bend method again.  In the garage the water cooled off far too quickly.  In the basement, I can get REALLY hot water in a capped length of PVC, and keep it hot long enough to soften the capstrip.  System 3 says T-88 works fine on damp wood…  I’ll try that and see how it goes.

Back at it – more ribs

Got the basement workbench cleared off enough to move rib production indoors.  So far I’m only using one jig, but I’ve knocked out two ribs now.  I need to get the second jig set up.  One rib per day isn’t going to cut it.  Sure is nice working in the basement instead of the garage though.

It’s damn cold outside!

I’ve been wanting to get back to building ribs.  The garage bench has been piled too deep to get anything done, and now it’s been below zero for over a week solid.  Insulation or no, it’s damned cold out in the garage.  Too cold for epoxy to cure, and too cold to work.

So…  there’s a perfectly good work bench down in the basement.  8′ long and rock solid, built by Dad back in the 1960s.  It’s been pretty much completely covered up for the past several years with a collection of parts, partially-disassembled or -assembled prototype projects and assorted debris from the side business I was running, plus a CNC router that took up about 3′ of it.  I have cleared most of it off (much of it into a trash can).  The CNC machine is shelved for now; I’ll maybe resurrect it when needed at a later date.  It will probably come in handy for cutting the instrument panel and/or nose ribs.

The next issue is containers for the geodetic rib braces.  There are 24 braces used in each rib, all of which are of course slightly different.  Just enough so that none are interchangeable.  I was using paper cups to hold them in the garage, but it’s a completely unsatisfactory solution.  In the basement I think I’m going to try stapling taller plastic cups along the back edge of the bench and see how that works.

I’m not moving power tools down there from the garage, so new geodetics will be cut with a razor saw.  We’ll see how that works out…  it’s one of those jobs I wish I could set up a machine or fixture to do.  It’s 24 different lengths with over 40 different angle cuts, so I’m not sure how I’d make that work.  Even cutting them out in batches on the band saw meant fine-tuning each one with a sanding block before assembly.  It’s fiddly work and tedious as hell.  Classic gusseted ribs would be a whole lot faster and easier to build.  If I were starting this over I’d probably just depart from the plans and build them all that way; I’d probably have them all done by now.


Another rib

Just so I could feel like I’m not totally stalled, I built rib #15 this weekend.  6cc of glue turned out to be just about right, with no skimping and very little excess.  The new method of mixing and applying the epoxy with an acid brush worked out well.  I think I will go back to an earlier idea I had, of pre-wetting the groove with glue before putting the top and bottom capstrips into the jig.  It will be easy to do with the brush, and will save some assembly time.  I have a template with pencil marks defining where the glue should go; I think I’ll mark the glue lines along the bottom and top of the jigs to make it easier to apply the glue.

Trying out the steam box

The other night I finished up the steam box and made a set of little standoffs for the bottom.  I wanted to keep the wood off the bottom of the box to allow air circulation, but also allow water to run back to the low point at the rear.   I got a little lazy and didn’t put in dowels like most plans show.

Tonight I loaded it up with eight cap strips and let it run for 45 minutes while I went out and hung some outdoor lights on the deck.  When I came back I found that the door had developed a pretty good curl — concave from the outside – and was venting a lot of the steam past the door seal.  The spruce inside was fairly pliable, so I clamped three pieces in my bending form and put four more in the rib jigs.  They would only fit partway down in the jigs, since the wood is swollen.  While the wood cooled down I got all of the geodetic braces ready to install.  I’ll glue these two ribs up tomorrow night.

I did email System 3 about their epoxy.  Some of the ribs were assembled with the capstrips not pre-bent.  They’re fine, but the wood will spring out of shape if it gets hot enough for the epoxy to soften.  I don’t want that to happen. so I was thinking about clamping them in their current shape and steaming them to relieve some of the stress in the capstrip.  Of course that will soften the epoxy, and I wanted to know what that would do.  Their answer is that T-88 will begin to soften at around 120 degrees, but once returned to room temperature will be at full strength.  That’s great news.

I’m definitely not in love with the geodetic rib bracing design.  24 braces, no two alike, and I’m having to hand-fit them all.  It takes for-freaking-ever.  I have to wonder how much heavier 3/32 plywood would be with suitable lightening holes.  A guy could pop sets of them out on a CNC router in no time, save a ton of time and effort on the ribs, and probably end up with much stronger ribs too.   But, I don’t think I’m going to re-engineer the ribs right now.

Second jig built

Yesterday I did a little shop cleanup.  Not a lot, just enough to get done what I wanted to do.  I cut a length of 3/4″ x 3/4″ pine and cut a bunch of 1-1/2″ blocks for the second rib jig.  I got the work bench partially cleared off.  The box from the R/C Cub went underneath, and the plans sheet and wings were moved to one end of the bench.  I now have roughly half the bench covered by model airplane wings, while the other half is being used to build the real thing.  ‘Murica, as my kids would say.

So, I built the second wing rib jig.  I used the first rib from the first jig and blocked everything up.  I used some plastic sheet Lisa had picked up underneath it to prevent the glue sticking things together.  When it was all finished, I mixed up 20cc of epoxy and glued up two ribs.  That’s going to work as long as it stays cold, but the glue was gelling by the time I was finished.  If it warms up at all there won’t be time to do two at a time, unless I can find a way to pre-glue the capstrip grooves a lot faster.  I wonder if thinning out a portion of the T-88 and brushing it into the grooves would work.  For that matter, I wonder if pre-gluing the grooves is even necessary.

This morning I pulled both ribs from the jigs.  You can’t tell them apart, and you can’t tell them from the other four I had done.  Any differences between the six ribs I have done are slight enough they can be removed by sanding.  So, now I can double my production rate.

More ribs

Rib #2 matches rib #1 to within plus or minus a millimeter or two everywhere.  I spent some time with an X-Acto knife and sanding block cleaning the excess epoxy off of the first rib, so it’s looking pretty good now.  Tonight I put #3 in the jig and glued it.

I was planning to make the second jig tonight also, but that’s going to just have to wait a little while.  The garage is getting too cluttered to work in.  I’ve got numerous tasks partially completed, and it’s a real mess.

  • I need to finish grooving the capstrips, first off, so I can use the table saw for other things. (done!)
  • I need to get the rest of the geodetic stock shaved down to final size.  I got my strip cutting jig from Rockler today, so we’ll see if the table saw can be used to help with that or not.
  • I need to cut more wood blocks for the jig.  With the spindle sander, I can make sure they are perfectly square. (done!)
  • There is some cleanup to be done, including two workbenches that are piled high with so much crap that I’m working with a rib building jig hanging over the sides on one end of the bench.  It’s an eight foot long bench and I’m using less than a foot of it.  Ridiculous.
  • I will need a place to store these ribs so they don’t get damaged.  And I definitely have to find a better solution for the geodetic braces.  The paper cups I have been using were a terrible idea.  They take up enough room that they’re a pain in the ass to use, and they tip over, fall off the bench and spill parts everywhere at the slightest bump or touch.
  • I have the table saw and spindle sander sitting halfway out in the middle of the floor, need to get a permanent location figured out.

That will at least get me to where I need to be to keep building ribs.  At some point I’m going to need another eight feet of workbench, but that can wait until I have the ribs and tail feathers built.  Pretty sure I can do all that on the 3 x 8 that I have now.

#2 rib glued

I spent some time cutting geodetic braces.  I stacked five of the thin capstrips, laid out the parts along them, and cut them with the bandsaw.  I now have enough parts to make half a dozen more ribs.  It’s slow going with the geodetic capstrip, because each one has to make three passes through the spindle sander to shave them down to 3/32″  Holy crap that’s tedious.  I may try using the table saw when the thin strip rip jig arrives.  Even if I can get them close enough to just make a single pass on the sander it would be a huge improvement.

I tried a different technique for applying the glue.  First I dry-fit all of the parts to make sure I didn’t end up with a brace with glue all over it that needed to be trimmed.  I marked the top and bottom capstrips with a pencil to indicate where the groove needs to be glued.  Then I pulled them out of the jig and used a trimmed-down popsicle stick to apply epoxy to the grooves.  Back into the jig, with the front and rearmost vertical pieces in place since those are impossible to install with the capstrips in the jig.  Then I proceeded as usual, installing all the other parts with epoxy.  It worked like a charm, and resulted in no glue running down where I didn’t want it.  We’ll see how this rib looks when I pull it out of the jig tomorrow…  and we’ll see how closely it matches the first one.  In theory they should be identical, but I’ve  never done this before, so…

Rib #1 out of the jig

This morning I pulled the first rib out of the jig to check it out.  I was a little apprehensive about it, to be honest.  I had tried to use a little digital scale to weigh out the epoxy, and that didn’t work well.  The scale didn’t see tiny increases in weight as “activity” and would power itself off every few seconds.  I ended up “eyeballing” the mix by volume, and hoped I got it right.  With a little less than 15cc of glue I was hoping it was right, and last night it was still feeling a little “tacky”.  Well, this morning that epoxy is perfect, nice and hard, glossy surface and zero tack.  My test piece with a couple of scraps of geodetic brace glued with no clamping broke apart in pieces, with no failure at the glue joint.  The wood failed and the glue didn’t.  Success all around.

The only deficiency I can see is, there’s maybe a little more glue than needed.  Glue had run down under several of the joint areas and I have some cleanup to do on the “bottom” side of the rib, the side that was against the jig surface.  I’ll need to figure out how to get the right amount of glue in there when I pre-glue the groove.  Other than that, it looks really good and I’m thrilled with it.  It looks like about 10cc is what is needed to glue up a complete rib.  That means when I get the second jig built, I can mix up 20cc and glue two ribs at a time.  The more glue gets mixed at one time, the easier it is to get the mix ratio perfect so that will be good.

And, I’ll have to put this rib somewhere in the middle of a wing where it can’t be seen by the Oshkosh judges.  That way it won’t screw up my chance at that gold Lindy.  🙂