Workshop assessment and kit inventory

I met with Stu over the weekend to figure out where and how we’d set up the spar assemblies. I was concerned about the lack of any long workbenches in his shop. He’s primarily set up for building cabinets, and most of his work tables are smaller, low to the ground, and on casters. As it turns out, one of the tables has folding extensions that make it 9 or 10 feet long. The top is very thick, heavy, rigid, and very flat — he uses it to mount rails and a sled for a router to flatten large slabs of wood. He put threaded inserts on the edges of the table where a set of heavy welded steel rails can be attached. With those installed, there will be a built-in straight edge for blocking and clamping the spar caps. It’s not something I would have thought of; the “normal” practice is to lay out a chalk line and nail wood blocks to locate the spar caps during assembly. I think, however, that this setup will be more than adequate for spar construction. I may need to build a matched-height extension for the wing assembly, but that’s a decision for another day.

The wing kit contains no hardware at all. Fortunately it looks like all of the hardware required is made from readily available material and requires simple manufacturing. It’s all flat aluminum stock, some 4130 tubing for bushings, aluminum tubing for aileron torque tubes, and so on. No brake, lathe, welder, etc. required yet. Some of the material I may already have on hand, in fact. The rest can be ordered or even found locally.

While I was there, I grabbed a few pieces of rib capstrip so I could finish off the last of the false ribs. I made two on Sunday, and set up two more this morning.

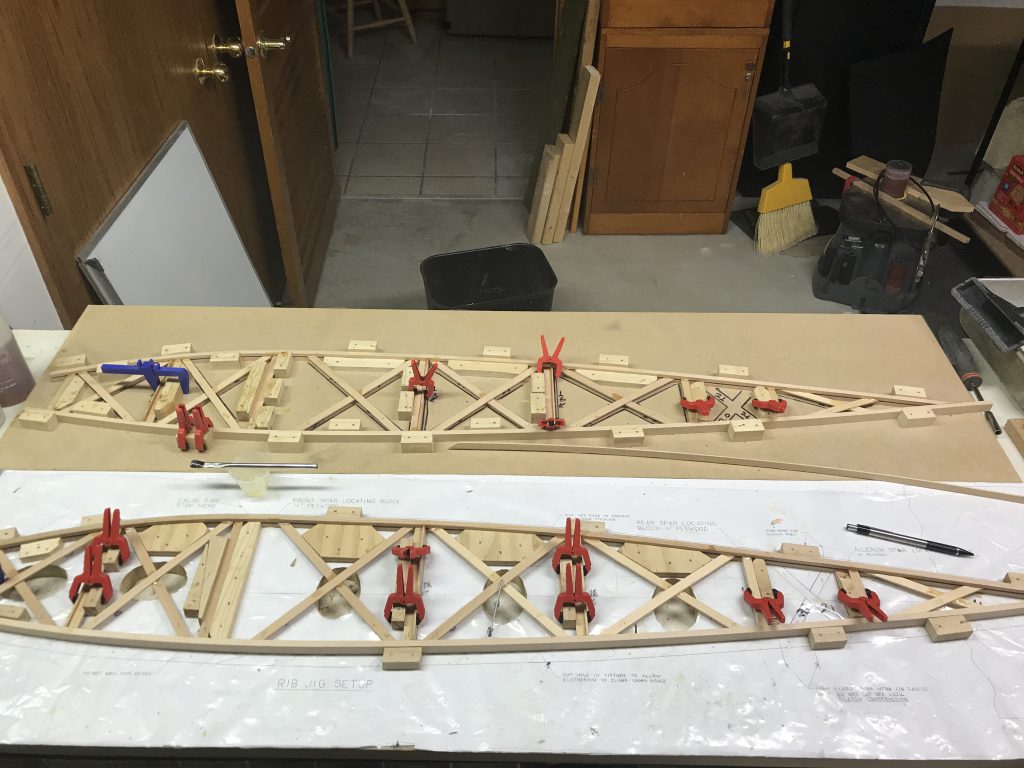
On the home stretch

Well, for wing ribs at least. 30 false ribs down, 8 to go. It looks like I may be able to get some more building done, at least temporarily, at the EAA Chapter 80 “Able Ace” build space. The chapter has leased a storefront in a shopping mall that’s dying a slow and pitiful death. There are a couple of good sized workbenches there that I may be able to use for wing spar and tail assembly.

More ribs

Got a couple more false ribs glued up, now I’m waiting for the epoxy to cure. I also unrolled the plans to get a good look at the wing layouts, and re-read the instructions for building wing ribs. The instructions say to make 42 main ribs (I have 43) and 37 false ribs. These two make 20, or it could be 21 if I cut down the extra main rib. I’ll just keep making them and see what happens. I really need to get that second jig back on the bench so I can do 3 at a time.

A few more false ribs

I glued up two more last night, and will do two more tonight. That will make 18 down, with 20 19 more to go. I’ll typically take some time at lunch to cut out the cross brace pieces and get everything set up. Then after work I’ll mix up some T88 and glue the ribs up, then let the glue cure overnight. By the next morning I can pull them out of the jigs and start again.

I’ve run out of cross-brace stock that’s been sanded down to 3/32″, so I’ll have to stop while I retrieve the small shop vacuum from the project house where it is now and run some more 1/8″ stock through the drum sander. It’s a pain, yes, but it has to be done.

I’m already debating where to go from here, once all of the false ribs are finished in a few weeks (maybe). I could start on the tail, but that will require a 4 x 8 work surface. The wing spars will require a longer bench, at least 12′ long. I may instead start working on cutting out the large number of nose ribs that will be needed, and the other high volume plywood parts. It’s awfully tempting to set up my CNC router again for that part, but I doubt that I will. I’d have to translate the outline from the printed plans into G-code for the router, and quite frankly I think by the time I got that right I could cut them all out by hand. I’ve seen a couple of guys use a router and a flush cutter to route the nose ribs from a pattern. I’m a little concerned about the radius on the inside corners where the nose rib glues to the false spar. I figure I could either sand a matching radius there, or touch up the corners of the nose ribs with a bandsaw or something. I’ll cross that bridge when I get to it.

Tempus fugit

Another year draws quickly to a close, with what feels like not a lot of progress on this project. I have a tall stack of ribs, but really nothing else. I had hoped to have a good start on the tail surfaces by now, but haven’t even started on them. We’ll need the basement for a family Christmas party, so no laying a 4×8 sheet of MDF over the island down there to start laminating pine. No worries, though. I have located some nice clear pine boards at Menard’s that will rip down nicely into 10′ long lamination strips. I have an order of Finnish birch ply queued up on Aircraft Spruce’s web site, ready to place the order once I’m sure I have all the stuff on there that’s going to be expensive to ship. As soon as we’re finished with the post-party cleanup, I’ll have the basement available to work in through the rest of the winter since the garage will just be a bit too cold for epoxy.

I also got a great idea from one of the guys on the Biplane Forum. I’ve been pondering how to store the wing ribs. I think I’ll build short pieces of main and rear spars out of pine and non-certified plywood, just to assemble all the ribs and clamp them together. That way I can surface sand them all together, and maybe if I’m lucky use that assembly to run them through the table saw for trimming as well. Maybe.

Stacking them up

Nothing new, but last night I gathered up all 47 full ribs and stacked them up, carefully aligning the cross pieces for the main spar, aft spar, and nose spar.  I was a little concerned about the amount of variation I might find, considering the ribs came out of two jigs over a period of 20 months.  I was very happy to see that there’s no more variation than could be attributed to wood thickness.  Less than 1/64″, probably under .025″ anywhere along any of the ribs.  Then I stacked up the dozen false ribs I have done so far, same story. 

Wait – 47 full ribs?  Yes, it seems somewhere along the line I must have lost count and built one extra aileron rib.  I’ll either keep it around as a wall hanger/test piece, or maybe stick it under the wing walk for a little extra support.  I’m not sweating it.

This exercise has also reinforced my idea to build a sled for the table saw to lop off the ends of the ribs for the leading and trailing edge pieces.  They are very highly consistent, as they should be, so I think that will save time and make subsequent assembly steps easier.

The bad news is — my T88 epoxy is junk.  I refilled the dispensing syringes and the resin looked a little “off”, not perfectly smooth and clear as it usually is.  Maybe a little cloudy and with a different texture.  I mixed up a small amount and glued up some test pieces.  Where I glued the flat sides two sticks of capstrip together, the joint held well and pulled apart well into the wood.  However, where I had glued a couple pieces of geodetic brace into the slots, the glue joints failed allowing the braces to pop out without breaking.  The glue also was not clear and hard, as it should be, but had an almost grainy or mealy texture to it.  I don’t have any trust in the remaining glue in those bottles.  I’m certainly not going to risk using substandard adhesive to save about $20 worth of epoxy!  Into the trash it goes.  I have two new bottles here, and half a dozen new 60cc syringes on the way from Amazon.


False ribs = true :)

Well, I set up the second jig for three false ribs.  I’m only making two at a time on that one, though, plus one on the first jig, so three at a time.  One of the three setups on #2 is just not quite “there” enough to suit me.  To be honest, I don’t really know how much difference it makes if there’s a 1 to 2 mm variance in the shape of the lower or upper surface of the airfoil.  I’m getting the ribs all as close to identical as I possibly can, but I know I’ll need to do some minor true-up work once they are all ready for assembly to the wing spars.  What I think I’ll do is stack them all together on some scrap wood cut to match the size and shape of the spars, then use a long sanding block to true everything up.  That’s a while of, still. 

In the mean time, I’ve got around a dozen or so of the false ribs done, and am cranking out 3 per day on the days I get any work done.  Now, however, I’ll have to take a day off to hot-soak and bend some more capstrip.  I’m out of the pre-bent pieces.

Minor milestone – the last full rib

Sitting in the rib jigs right now are the last aileron rib (#16 of 16), and the sixth false rib.  After the glue cures on these, I’ll modify the second jig to fit as many false ribs as possible.  I think I can fit three on it for sure, possibly four – but that’s doubtful.  I’d like to start cranking out four false ribs at a time.

So I guess it’s time to go start shopping for the best plank or two of white pine I can find to get started on the laminations for the tail surfaces.  Pretty sure Menard’s will be my source for those; the stuff I find at the other big box stores is more suited for a dog house or the pulp mill than anything else.