Aggravating complication

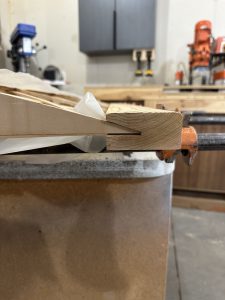
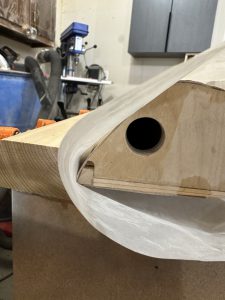
So, I found the plan supplement that talks about the aileron interference. Written in 2010 — seven years before I bought my plans — it notes that the rear spar was changed at some unknown point in the past, by someone, but never really documented, and the “updated plans will be sent out as they are available”. Which, apparently, they never were and probably still aren’t. Then it talks about plans delivered electronically (which they weren’t, and to my knowledge weren’t offered) having an updated sheet with new dimensions for the ailerons. It also says that this is only an issue with the upper ailerons hitting the CAW9 bracket. Uh, no. The lower aileron hits the head of the bolt holding the CAW3 bracket. There is one sheet that seems to show an upper aileron, with no dimensions to be seen anywhere. Wonderful.

So what’s their brilliant solution for fixing an already built aileron? Simply move it rearward to clear the bracket – this means take a hole saw to the wing to move the torque tube back in order to move the aileron. Then just cut off the trailing edge to match the rest of the wing, and sand all of the aileron ribs to match the contour of wing at the new location. Oh, and that’s probably going to remove enough rib cap material that extra bracing will be required… How many ways can this be wrong?

I get the impression that whoever wrote all of that has never actually built a Celebrity wing with 3/4″ rear spar caps. Meaning, whoever it was hadn’t built a Celebrity wing to check this stuff out since 2010. Come on.

I’m currently evaluating whether notching the lower leading edge of the aileron is an option. The actual aileron spar wouldn’t be affected, and the torque tube runs the entire length of the aileron, so it’s not like it could fold up and depart the aircraft. Still, I don’t want to weaken the thing and take the risk of cracking or anything, especially since this structure will all be under fabric and not easily inspected. Stu seems to think it wouldn’t weaken the structure, but he’s a carpenter and cabinet guy, not an engineer (and neither am I).

I’m going to have an actual engineer look at this and give me his opinion. I could always add a layer of 1/32 or even thicker ply if needed, but my gut feeling is that it’s not going to weaken anything enough to matter. In the mean time, I’ll keep pushing on, but this is kind of a kick in the nuts, to be honest. I’m sure a year from now I’ll look back and marvel at how little it actually mattered. I would feel sorry for anyone buying a set of plans now at over $3K and probably still not updated… I hope the new owners of the Fisher IP take the time to fix this kind of stuff.

Nearly there…

I keep finding little things that still need to be done on this wing. At least it won’t take as long to do the next one. I’ve been getting over there nearly every day, but the little bits of work here and there didn’t seem worthy of a complete build log post. But since the last update:

  • Cleaned, primed, and drilled the fittings for the upper/lower aileron pushrods
  • Located and drilled holes for the aileron bearing block screws
  • Managed to punch a hole in the aileron LE skin, and glued a patch over that (will need to smooth it out with some micro)
  • Worked to trim the upper aileron bay piece to get full UP travel on the aileron

I also found that the aileron DOWN travel is restricted by one of the bolts for a fitting on the rear spar. I recall reading that the rear spar thickness was changed from 1/2″ to 3/4″ at some point, and that causes interference. The aileron should have 22 degrees travel in both directions; I get about 15 – 17 degrees down right now. It would be less if the aileron and wing were covered. I need to dig though the plan supplements and find the section that talks about that and see how to fix it. The obvious choice would be to notch the lower front corner of the aileron leading edge to clear the bolt head, but I’d really prefer some other solution… it sure would have been nice for whoever did the plan changes along the way to have properly documented this stuff on the drawings themselves, rather than just tacking on random pages with these “Oh, by the way…” notes (which are themselves occasionally wrong).

Wing fittings and aileron work

I’ve spent a couple hours this week getting bolt length sorted out and getting some of the wing fittings attached.

My strategy for the wing attach fittings was to make one of each type of fitting, pilot drill the holes with a 1/8″ bit, and use those to mark the location of the holes in the wing spars. Those holes got drilled on a drill press using Forstner bits. Then I cut the rest of the fittings, used the first ones as templates for drilling them, and figured all of the holes should line up.

Well – they’re close. I’m not a machinist, nor am I using tools techniques of suitable precision to produce perfect parts. For example, when looking at the CAW2A wing root mounting brackets, the holes are not perfectly aligned – so there’s a top and bottom to those, meaning until I figured that out it took a few tries to get everything lined up right. No big deal.

Then I discovered that one of the holes isn’t drilled perfectly square. It’s only off by maybe .010 total, but just enough that you can’t run a bolt through the forward bracket, the bushing, and the aft bracket without interference. If the bolts were just going through holes drilled in the wood of the spar, it would be fine – but the bushings are a snug fit, I had to do a little adjusting of that hole to get everything to fit properly.

We finally got the bottom of the aileron leading edge routed so that it’s now in its final state. When fitting the aileron and checking travel, I discovered that I’d messed up just a little when up finishing out the aileron bay. On the first wing, I’d positioned the top beveled strip with the aileron in place, and checking clearance per the plans. On this one, I just measured the first wing and matched it. I don’t have enough up travel on this aileron. After a little more investigation, it’s just the ends that interfere, so easily cleaned up with a couple minutes of work with the razor plane. I’ll need to pay closer attention on the next two wings. I’m thinking just use a length of 1/4″ shim stock to set the spacing with the aileron solidly fixed in its final location.

Wing metal parts

Over the past couple of days I’ve been collecting, drilling, and prepping the aluminum wing attachment parts. These are a collection of pieces cut from 6061 and 2024 AL bar stock. They will be used to attach the wing spars to the fuselage, attach flying and landing wires, and attach the N struts, and connect the upper and lower ailerons. Each one must be cut from the raw bar stock, drilled for bolts, and some of the ends rounded. I’ll do some sort of finish to prevent corrosion. I have some Alodine left over from when I was building the RV-12; if it’s still usable I’ll use it. If not, I’ll most likely buy some.

More than once the instructions have caused a little bit of panic. For example: Yesterday I drilled all of the holes in the attachment brackets to their final quarter inch (0.250) size. I remember that I’m short some pieces, but didn’t remember which ones or how many. I’m also unsure of which ends of which brackets need to be cut and sanded round. This morning I looked at the plan revision sheets that show the drawings for the parts… and saw that the drawings call out all of the holes to be 0.1875″. Panic!! Holy moly, did I just ruin all of those parts and waste all of that work? Oh, wait. I’d made little 3D printed pieces to help mark the ends for cutting… and those have 1/4″ bosses to fit the holes, so I planned 1/4″ holes before. And a 3/16 hole would fit an AN3 bolt. I’m pretty sure the plans call for AN4 bolts everywhere, and there’s no way in hell I’d be comfortable with wings held on with AN3 bolts…

Back to the wing spar plans… Yep. AN4 bolts and 1/4″ ID bushings everywhere. The supplemental drawings are incorrect or out of date, no big surprise. Back to work.

I did manage to badly mis-drill one of the CAW9 brackets, so that’s scrap — but it really doesn’t matter in the long run. I came up a little short on the 3/16″ 2024 stock needed for some of the parts, so I’ll need to buy another 12′ length anyway. It’s an odd size that is difficult to find on line, but fortunately my local supplier can get it for me even in single piece quantity. Even they don’t list it in their catalog. Most places only carry 2024 in 1/4″ thickness or more.

After inventorying my parts I need another 60″ or so of 2024 stock, and I only have about 3′ if that. Fortunately the parts I have on hand are enough for the two lower wings, so I can cut the bushings, buy hardware, and attach all the pieces on the two wings I have built and get them finished before moving on to the upper wings.

I got over to the shop to make sure the bolt lengths called out in the plans were OK. I’m glad I did. IN each case I decided to bump the bolt up one number to get the next longer grip length; the exception was the three bolts on each wing that attach the CAW-4 landing wire brackets. Those were specified nearly half an inch short; I had to go from AN4-20A to AN4-24A to get the right grip length. I’m glad I checked. I also ordered a couple dozen standard and half-thickness AN960 washers to get everything done up right. The hardware is ordered, now I just need to get the bracket ends done and get them prepped for installation.

A couple days’ work

Saturday: Ripped the CW37 parts down to the proper 1/4″ thickness. These are the strips with one beveled edge that go in the top and bottom of the aileron bay. The parts I got are 1/2″ thick, which won’t work anywhere. Ripped them all down to 1/4″ so I don’t have to do that again for the other two wings. With them cut to the right thickness, I cut one to length and glued it into the bottom of the aileron bay.

Then I discovered (or confirmed) that I’m an idiot… there were a couple of missing aileron pieces that I found in the bottom of the parts crate. Had I installed them in the first place, the little triangular braces would not have been needed. It’s no big deal; I was able to slot the nose skin support spar and get them glued in.

Today: Got the nose skin plywood glued onto the front of the wing. I think there are now about 70 or more clamps on the wing. I had planned to glue the top aileron nose skin in place, but that’s going to take some more work. I see no way to get that ply to stay attached all the way around without some sort of clamping jig. Stu and I figured out a good arrangement, but I’ll need to get some MDF, ply, or pine scrap to cut them out of. I need seven sets of clamping blocks for the nose and trailing edge, then I can use bar clamps to hold everything in place.

I also found that a few batches of glue I mixed up over the past week or two were probably not the greatest. My T88 had started getting cloudy — a sign that the resin is starting to crystallize. Some of my test pieces failed at the glue joint, albeit with a lot of force required, instead of the wood failing before the joint. I’m not really concerned about this. All of the affected glue was used for either the wing walk or adding corner blocking and gussets to the wingtip bow. The wing walk pieces are fully supported and there will be no bending, twisting, or pulling loads applied. The glue is strong, just not AS strong as what I’ve used everywhere else.

I have since tossed the syringe of clouded resin, warmed the rest of my resin supply until it’s crystal clear, and verified that test pieces now all break well into the wood rather than at the glue line. I’ve tried spruce to spruce, which tore apart well into the wood, and spruce to plywood which ripped the plywood apart.

Wing work 2/10/24

This covers a couple days’ work. Yesterday we ripped the CW37 aileron bay TE stock down to 1/4” and I got that installed. Today I’ll glue in the triangular support pieces. And yes, I realized after cutting and gluing it all up that the CW37 piece is supposed to be notched for the rib caps. I’ll remember that for the next time.

I continue to be astonished at how light and strong this wing is. I can easily lift it off the bench and move it around; it can’t weigh more than 20-25# without the aileron installed.

The last thing that was really bugging me about the aileron was that the lower edge of the leading edge plywood still wasn’t glued down. I’ve got to find a better way on the next aileron, but this one had to be done so we can radius the lower edge.

Stu’s idea was to make a grooved board for the trailing edge and use that to clamp a board across the leading edge while the glue sets. He used a length of scrap cedar with a groove cut to match the angle of the TE, and we used four bar clamps to apply pressure. In hindsight – I honestly don’t know if just putting a radius on the front corner and wrapping plywood around it would be better or not. We’ll see how this works out.

In other news, Stu has his 4’ CNC machine in and working, and I’m going to put him to work cutting my torque tube bearing blocks out of some UHMWPE stock I have. Better than plywood, I think.

11/11 update

How many mistakes can one man make? Enough… thank God I’m building this out of wood, so things can be fixed!

With enough of the aluminum bits cut and drilled to get the spars drilled, I started laying out the hole locations for drilling. Along the way I found a couple of places where I’d gotten blocking in the wrong places for various reasons. Fortunately, in each case I was able to simply add some well fitted wood blocks to get the support where it’s needed. So far I figure the plane will be about two ounces heavier for the extra wood and epoxy. I can live with that. Still, it’s caused a bit of angst.

As of this morning, the next step is to cut the slight angle on root ends of the lower wing spars, drill the holes for all of the bolts, then start actually assembling a wing. At last.

Just making sure…

Reluctant to toss a fair amount of epoxy, I mixed up a larger batch of about 8 CC, just to make sure I got a good mix ratio.  The first batch I had mixed to test the suspect glue was very small, and I figured I may have just muffed it.  No such luck.

I mixed 8cc, then glued two pieces of capstrip together with a totally unscientific scarf joint.  I then glued in two short pieces of geodetic brace stock, ends cut at roughly the angle of the braces in the ribs.  After 24 hours of cure time, all three joints came apart at the glue line, not the wood.  Into the bin it went, all of it.  I’m glad I didn’t use any of it for construction.  Fortunately I have another quart of epoxy here, unopened, and some new syringes.  I’m now set up with fresh glue in new dispensers. 

Stacking them up

Nothing new, but last night I gathered up all 47 full ribs and stacked them up, carefully aligning the cross pieces for the main spar, aft spar, and nose spar.  I was a little concerned about the amount of variation I might find, considering the ribs came out of two jigs over a period of 20 months.  I was very happy to see that there’s no more variation than could be attributed to wood thickness.  Less than 1/64″, probably under .025″ anywhere along any of the ribs.  Then I stacked up the dozen false ribs I have done so far, same story. 

Wait – 47 full ribs?  Yes, it seems somewhere along the line I must have lost count and built one extra aileron rib.  I’ll either keep it around as a wall hanger/test piece, or maybe stick it under the wing walk for a little extra support.  I’m not sweating it.

This exercise has also reinforced my idea to build a sled for the table saw to lop off the ends of the ribs for the leading and trailing edge pieces.  They are very highly consistent, as they should be, so I think that will save time and make subsequent assembly steps easier.

The bad news is — my T88 epoxy is junk.  I refilled the dispensing syringes and the resin looked a little “off”, not perfectly smooth and clear as it usually is.  Maybe a little cloudy and with a different texture.  I mixed up a small amount and glued up some test pieces.  Where I glued the flat sides two sticks of capstrip together, the joint held well and pulled apart well into the wood.  However, where I had glued a couple pieces of geodetic brace into the slots, the glue joints failed allowing the braces to pop out without breaking.  The glue also was not clear and hard, as it should be, but had an almost grainy or mealy texture to it.  I don’t have any trust in the remaining glue in those bottles.  I’m certainly not going to risk using substandard adhesive to save about $20 worth of epoxy!  Into the trash it goes.  I have two new bottles here, and half a dozen new 60cc syringes on the way from Amazon.


Well, that was dumb.

I was filling the 60cc syringes I use for dispensing T-88 epoxy in an exact 1:1 ratio.  Typically I overfill them a little, then stand them on end tips up to let the bubbles rise to the top, then squeeze a little back into the bottles to get the amounts in each syringe evened out.  Yeah, it’s a little picky, but it lets me easily keep the ratios exactly the same.  Anyway, I got a little distracted, and accidentally squirted about 4cc of hardener right into the half-full bottle of resin.  Oops.  All I could do without making things worse was let it sit.  I thought about trying to scoop it out with a long handled spoon, but decided all I’d really do was mix it in.  I figured either I’d end up with a hardened mass on top that I could scoop out later, or it would ruin the entire remaining half bottle of resin.  That would be about $22 worth of epoxy…  not the end of the world, but it would kinda suck.  I was hoping the hardener would not slowly sink to the bottom, ruining resin as it went.

Well, I got lucky (or science worked in my favor).  Today there was a gooey layer of semi-cured epoxy sitting on top of the resin.  I was able to scoop it out using a chunk of scrap spruce.  Assuming things don’t go south in the next few weeks until I need to refill the syringes again, it looks like things will be OK.