Not entirely dormant

I haven’t posted any updates to speak of this month.  I did get out to the garage and spend a couple of hours sanding down rib geodetic stock..  What a pain in the ass.  I really wish I’d gone a different route than I did on this stuff.  I just don’t know what that route would have been.  Anyway, today I started taping stacks of geodetic strips together and cutting braces.  I’ll do as many as I can before starting to build ribs again, so hopefully when I can return to building I can get some momentum going.

I have to be honest…  I look at some of the single-seat parasols and think, “Hey, I could be building half as many wings…”  But I just need to stick t this.  It will be worth it in the end.  I’m working on an idea to semi-automate the sanding of the geodetic stock, I just need to fabricate a couple of guides and use a stepper motor to feed the stock through my sanding rig.  That could increase throughput and give more consistent results, while I get other things done.

A little setback

This morning I went out to check on the two ribs I had glued last night.  The epoxy was set, but just a little “tacky”.  It’s pretty cold out in the garage, as the outside temperature has dropped into the 20s and low 30s.  I figured it was cured enough to be OK, and pulled the ribs from the jigs so I could compare the first rib out of the new jig to the others.  It’s a perfect match, so I set them on the bench and went inside.

A couple of hours I went out again to do some cleanup.  I found the two new ribs had pulled apart at the leading edge!  The glue was still pliable enough that the “spring” from the wood very slowly (judging by the long strings of epoxy still joining the pieces) pulled them apart from the main spar forward.  Fortunately I caught it before the glue had completely finished curing.  With some wiggling I was able to remove the geodetics from the capstrips and clean off as much of the excess epoxy as possible without carving into the wood.  I put the ribs back into the jigs, and will re-glue them tomorrow.  I’m pretty sure I can salvage and repair these two, but if I’m not 100% confident in them they’ll be scrapped.

I really want to figure out an arrangement to steam the capstrips.  Soaking in cold water doesn’t really seem to do much good, which is why I had not pre-bent these.  Trying to soak them in hot water works for about 10 minutes until it’s no longer hot water.  Two out of the six or eight I’ve bent in my former have split during that process.

Shaving the geodetic pieces

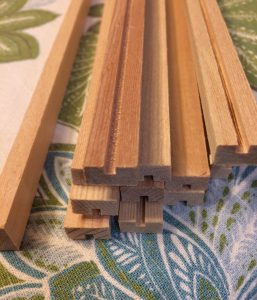
Yesterday I tackled the problem of the rib geodetic pieces.  The thinnest I could order from anywhere was 1/8″, and the plans call for 3/32″ thick.  What I got from ACS was actually a bit oversized at .130 to .140.  So, I need to shave about .040 to ..045 or so off of 120 or so 6′ long strips of spruce.

I tried a small razor plane…  no joy there.  Maybe it was my technique, but the blade dug in and left a very rough, uneven surface.  It’s quite possible I could make this work with a “real” hand plane, but I’d have to go buy one, then learn to use it properly, and let’s be honest — right now I’m a little impatient to start building.  I tried spinning up an end mill in the CNC machine, but it was obviously over-taxed and would take several passes.  Probably the wrong tool for the job.  Maybe a router bit would have been better, but there was also a work space issue, and the small motor and flex shaft drive was not going to be up to the task.  I knew I was fighting a losing battle there.  My Harbor Freight belt/disk sander seemed promising, but the top roller on the belt is convex and was leaving a concave surface.  I was not too confident in trying to use the table saw to shave them down, given how quickly things can go wrong there.

I ended up buying an oscillating spindle sander at Menard’s.  With a guide board clamped to the table, it lets me feed the strips in and sand them down to a nice consistent .093″ thickness.  It’s really slow going to try to do it all in one pass, so I set up a second guide board on the other side to knock them down about half way.  One pass on one side, then a second pass on the other side of the drum and I have what I need.  It still takes quite a bit of time.  I installed the second largest drum, 2″ in diameter, but I think I’ll re-set it up with the larger 3″ drum instead.  The higher speed of the drum surface may help to make it go a little faster, and the larger surface area might keep the drum from loading up or wearing out longer.  With the shop vacuum sucking dust out around the spindle there’s virtually no sanding dust floating around, so that’s nice.

I got four strips done before I knocked off for the day.  Doesn’t sound like much, but there was also a few hours of Pinewood Derby axle and wheel work in there, as well as some play time with the grandkids.  Oh, and I did groove a couple dozen more rib capstrips too.

Bending wood and building stuff

This morning I went out to check the epoxy on the bending form.  It’s not warm in the garage (low 50s), not ideal for curing epoxy.  In addition, I was not too precise in mixing the epoxy.  I have a small scale that weighs in grams, ounces or even carats that I plan to use for epoxy to be used when measuring epoxy for actual airplane parts, but I didn’t use that last night.  Anyway, the glue was hard but still a little tacky on the surface – so not totally cured but “OK enough” to use.  I pulled the three capstrips out of the water soak and clamped them in the form.  A few hours later they had taken a fairly good set — but one of them cracked at the peak of the bend.  Looking at that one, it would have been OK if I’d either bent the other end, or cut the slot on the opposite side.  I just happened to try to bend it in a direction that didn’t work well with the grain slope of that piece of wood.   I’ll have to watch that on future pieces.

Knowing that I’ll want to rip some 1/8″ thick strips to make the wingtip bows and the frames for the tail feathers, I went looking for a way to do that easily.  I’ve been successful in ripping thin strips on the table saw, but as countless others have discovered doing it between the blade and rip fence is not the safest way.  The blade tends to launch the cut strip backwards off the saw table.  I found this thin strip rip jig at Rockler.com, which looks to be exactly the tool I need to rip pieces for laminating.  It’s not expensive, and I can think of a dozen other projects for which it would be very useful to be able to make strips for curved laminations.  I ordered it.

At lunch time I pulled the strips out of the bending jig and installed the rest of the forming blocks on the rib jig.  As I thought, the bottom capstrips won’t need to be pre-bent.  So, the first rib jig is ready to go.

The next job will be to shave the 1/8″ x 3/8″ strips received from ACS down to 3/32″ thick.  They’re actually a little thicker than spec, around .135 or so.  I thought about setting up something to jig up my low end belt/disc sander to do the job, but I don’t see a lot of success there.  I have a razor plane, but it doesn’t seem to work well on the wide side of the spruce strips.  I will have to figure out a good way to shave or sand or plane these down to the right thickness.  I did cut out all of the geodetic braces for the first rib, and marked them according to their placement.  I’ll use them as patterns to cut the remainder — just as soon as I figure out how to get those strips pared down to the right thickness.  Sanding just the ends down is going to be too time consuming and the results would probably not be consistent enough to suit me.  I need to figure out the best way to shave about .040 to .045 off of those strips.

Finally — the first shipment of spruce!

The UPS man just delivered a 30# package of spruce capstrip from Aircraft Spruce.  I can now — finally — start building.

The first step was to set up the table saw to groove the top and bottom rib capstrips for the geodetic braces.  They need a 3/32 x 3/32 groove cut on one side.  Getting the saw set up to cut a perfectly centered groove was trivially easy, and it gave me a reason to install the zero clearance throat plate on the saw for the first time.  Not wanting to experiment on the expensive spruce, I cut a couple of strips of pine the exact size of the capstrip and used one to set up the saw for the right depth and spacing.  The strips are small enough that rather than trying to use a push stick to feed it all the way through, it works out best to feed most of it through in one direction and then flip the piece around and feed the other end in.  The saw is set up precisely enough that you can’t see where the transition is between the grooves cut from the two ends.  It’s perfect.  With that done I grooved a dozen pieces of capstrip and decided that would be good for a limited test run.

I’ll also need a bending jig for the capstrip, since the top piece needs a pretty good curve toward the leading edge.  I could really probably do it dry, but I’ll feel better knowing that the wood is less stressed during assembly.  Better to put the curve in beforehand, I think.  The spruce is flexible enough that I don’t think there will be a problem with the bottom pieces, but we’ll see how it works out.  I cut a bending fixture from a chunk of scrap 2×4 — it split on the end as I was finishing up the cut, so I figured what better time to mix up a spoonful of T-88 and epoxy it back together?  After all, the glue joint should be stronger than the wood itself.  We’ll test that out.  Once that glue cures and I get some capstrip soaked in water and bent, I will finally be able to finish blocking in the rib jig and start cutting the geodetics.  I’ll need to also set up some sort of rig to sand or plane the ends of those down to 3/32″.

The grandkids are coming over Saturday to get some help with their Pinewood Derby cars.  Looks like a full-on woodworking weekend.

On the way… maybe?

Well, 24 days after placing my order Aircraft Spruce finally shows a tracking number for my capstrip stock.  We’ll see if it actually shows up this week.  For a while there I was afraid this would just be a blog about how difficult it is to obtain spruce…  maybe eventually I will get to actually build some airplane bits.

So, note to self: Lesson learned.  Always order wood at least a month ahead of needs, preferably two or three months.  Looks like it’s time to start on the spar stock and the stuff I’ll need for the tail surfaces.  That order might be here by the time I finish the ribs.  There’s a time scale that obviously applies to wood construction that is quite different than what I’m used to.  And it’s not like I can just run down to the lumber yard and pick out some suitable spruce or Douglas fir.

You gotta be kidding me.

So today, more than two weeks after placing an order for wood from Aircraft Spruce and five days after contacting their customer support to ask where the hell my order was, I finally get a response that they will be shipping three more days from now.  That will be a full three weeks from the time I placed the order, and also means I go yet another weekend without any supplies.

Strength vs. weight vs. work (rib geodetics)

While waiting (still) for my spruce to be shipped, I did some figuring…

Building from plans means not getting the wood factory cut and grooved.  There are just some pieces that you can’t buy off the shelf.  The Celebrity plans call for rib geodetic braces made of 3/32″ x 3/8″ Sitka spruce.  ACS and Wicks sell spruce capstrip down to 1/8″ thickness, but not 3/32″.  So the choices are to plane or sand down the entire length of the 1/8″ x 3/8″ strips, or use them as is and just sand the ends to fit the grooves in the top and bottom capstrips.  So how much extra weight will we end up with if we just use 1/8″ thick pieces?  It’s 1/32″ thicker, so we’ll do the math…

1/32″ x 3/8″ wide x 1464″ of capstrip = 17.25 in3 of extra spruce.  Sitka spruce weighs about 28 pounds per cubic foot (or 1728 cubic inches), so 17.25 / 1728 = .009928 ft3 x 28 lb gives us a little over a quarter of a pound, less whatever gets sanded off on the ends and scrap, etc.  So…  around four ounces or less; I can live with that.  Still, I’m thinking I may set up a spindle sander with a 3/32 gap to do the ends.  If it works well enough I could run the entire lengths of the strips through it, then so much the better.  Of course that would probably mean having to buy a new power tool.  Oh, no!  🙂


Waiting…

Well, I placed my first order for wood from Aircraft Spruce.  I ordered what should be enough spruce capstrip stock to build all f the wing ribs.  Should be here in a couple of weeks.  I guess I wasn’t thinking…  maybe I figured they kept this stuff in stock.  If I’d known there would be a 10-day lead time, I’d have ordered it two or three weeks ago.  Live and learn.

In the mean time, there’s not a lot to do.  If it warms up at all I may try to rip some 1/2 by 1/4 stock out of pine and get the saw set up to groove the rib capstrips.  I’d love to finish up the rib jig before the wood gets here.